
Using an LED to Show WMI Activity
Many users prefer to install a Light Emitting Diode (LED), somewhere on the dash, in order to show the activity of their Water Methanol Injection (WMI) system.
With the CM5/CM5-LT this can be easily accomplished using two basic approaches.
First some LED theory...
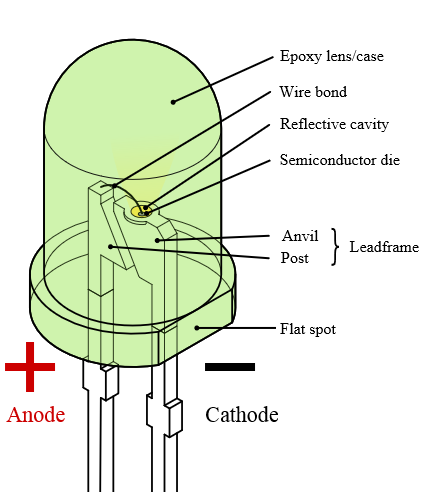
A LED is a two-terminal, polarized device. That means that its polarity must be considered when it's installed or it will not turn on. The two terminals are called CATHODE and ANODE. When the CATHODE is connected to GROUND and the ANODE is connected to a positive voltage, the LED will turn on.
The CM5/CM5-LT has two General Purpose Outputs (GPO1 and GPO2) which can be used to control an LED. These outputs are "pull-to-ground" type which means that whatever load is connect to a GPO it will be connected to ground whenever that GPO is active.

So the LED's ANODE must be connected to a positive voltage while its CATHODE must be connected to the GPO on the CM5/CM5-LT what will be used to control it.
The positive voltage in the diagram shown above can be either 5Vdc that is taken from one of the spare RED (5Vdc) wires on the CM5/CM5-LT's Input/Output connector, or it can be 12Vdc sourced from a switched and fuse-protected connection somewhere else in the vehicle. LEDs draw very little current (around 0.02A) so they won't likely overload an existing ignition-switched 12Vdc circuit in the car.
Majority of LEDs operate at around 2Vdc. This is called their Forward Voltage. In order to run an LED from 5Vdc or 12Vdc, an in-line (aka series) resistor is required, which will drop the higher voltage to the 2Vdc level the LED can operate at. Connecting an LED directly to 5Vdc or 12Vdc without a series resistor will destroy the LED.
If using a regular LED such as the one described above, the following series resistor is recommended for 5Vdc operation:

and for 12Vdc operation:

There are many LEDs that come with a built-in series resistor that can be safely operated from from 5Vdc or 12Vdc eliminating the need for adding your own resistors shown above.
Here are some examples of LEDs that come with a threaded metal bezel and 6" long lead wires, which greatly simplify dash mounting:
L60D-G5-W (Green 5Vdc)
L60D-G12-W (Green 12Vdc)

L60D-R5-W (Red 5Vdc)
L60D-R12-W (Red 12Vdc)

L60D-A5-W (Yellow 5Vdc)
L60D-A12-W (Yellow 12Vdc)

There are many other colors and bezel styles available.
There are two basic LED indication modes that can be implemented in TorqTune to show WMI activity:
1. Hard ON/OFF LED Operation - The LED is fully ON when the pump is running and fully OFF when the pump is OFF.
2. Pump Duty-Matched LED Operation - The LED is operated with the same duty as the pump. This causes the LED to flash faster (i.e. get brighter) or slower (i.e. get dimmer) depending on the pump's duty.
Assuming the LED is correctly wired to GPO1 and assuming the following table is used for WMI pump control on the CM5/CM5-LT's MAIN output here is how the two approaches can be realized.

1. Hard ON/OFF LED Operation
To have the LED turn ON when the pump starts we need to look at the table entered on the Main Table tab. This will obviously vary from set-up to set-up, but in this example we can see the pump is off at 2500 RPM or less and 6 PSI of boost or less.

The CM5/CM-LT will start the pump as soon as these two values are exceeded, so on the GPO1 settings screen we should:
1. Select the mode ON above setpoint, OFF below it from the GPO1 control dropdown menu.
2. Set value in the MAP sensor is equal to or greater than field to 6.0 PSI.
3. Set value in the Engine Speed is equal to or greater than field to 2500 RPM.

With these settings applied the LED will turn on as soon as the pump duty is non-zero and will stay ON regardless of the actual pump duty.
2. Pump Duty-Matched LED Operation
To have the LED flash faster or slower (i.e. dim and brighten) in relation to actual pump duty, simply enter all the same settings (including the table cell values) on the GPO1 Table tab as were entered on the Main Table.
Main Table:

GPO1 Table:

With these settings applied the GPO1 duty will track that of the Main output and the LED will provide a visual indicator of the relative magnitude of the pump's duty.