
GPO - Relay Control
CM5 and CM5-LT are equipped with two, pull-to-ground, General Purpose Outputs, GPO1 and GPO2 that can each be configured to switch ON or OFF either ABOVE or BELOW some setpoint.
This setpoint is a combination of engine RPM and either boost or analog voltage inputs A or B.
GPOs are limited to sinking 1.5A or less. In situations where higher current is required a relay must be used. This blog post covers relay control with the CM5/CM5-LT.
Since the GPOs are pull-to-ground outputs the correct wiring is to connect the relay's positive coil terminal to a switched ignition source that is a part of the vehicle's factory electrical system. This way, the relay's coil will only receive power when the ignition is ON. It's important to install a 2A fuse in-line with this connection and place it as close as possible to the ignition switched source where the power is being taken from.
The relay's negative coil terminal should be connected to the desired GPO on the CM5-LT.
Whenever a GPO on the CM5 activates, the relay will operate and connect (or disconnect) the signals you have attached to its Common (COM), Normally Open (NO) and Normally Closed (NC) terminals.
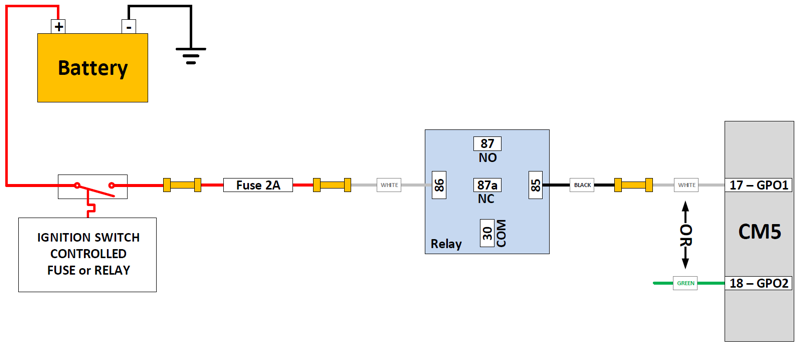
![]() CM5/CM5-LT Relay Wiring Diagram
CM5/CM5-LT Relay Wiring Diagram
Testing the Wiring
BEFORE using the relay, the wiring should be checked.
This is easily done using the Output Overrides on the main Settings Tab in TorqTune.
Turn the key to ACCESSORY, but don't start the engine.
Connect a USB cable between the CM5 and your Windows laptop and launch TorqTune. Ensure the unit is connected by looking for a green LED at the bottom right corner of TorqTune.
Once TorqTune shows the unit is connected navigate to the Output Duty Overrides section at the bottom left corner of the Settings tab.

Make sure you are close enough to the relay so you can her its "clicks".
Let's assume your relay is connected to GPO1. Enter 100 in the GPO1 duty field and hit Set. You should hear the relay "click" ON.

Now hit Reset. You should hear the relay "click" OFF.

This should confirm that your wiring is correct. Turn the ignition OFF.
TorqTune Configuration
This section assumes that your MAP sensor is properly calibrated and that all the key parameters on the Settings tab have been entered correctly.
Navigate to the appropriate GPO Table tab and from the Vertical Axis dropdown menu select whether you want to control the relay based on boost (i.e. the MAP sensor) or based on one of the two 0-5V analog inputs A or B.

We'll be using boost in this example.
From the Mode dropdown menu, select either the ON above setpoint, OFF below it mode or the OFF above setpoint, ON below it mode. Do not use the Duty table mode since the relays cannot be driven with a variable duty signal that is generated in this mode.
The other four modes would turn the GPO ON or OFF depending on whether or not there was a soft overcurrent or undercurrent fault detected on the MAIN or AUX pump output, but that is covered in a separate blog post HERE.
In the ON above setpoint, OFF below it mode example shown below, the GPO (and the relay) will turn ON whenever the RPM and boost BOTH rise above the entered values (4 PSI and 1500 RPM, in this case). When either RPM or boost drop below their respective value the GPO (and the relay) will turn OFF.
If only RPM or only boost should be used for GPO control in this mode, simply enter zero (0) for the parameter that should be ignored.

In the OFF above setpoint, ON below it mode example shown below, the situation is reversed. The GPO (and the relay) will turn OFF whenever the RPM and boost BOTH rise above the entered values (4 PSI and 1500 RPM, in this case). When either RPM or boost drop below their respective value the GPO (and the relay) will turn ON.
If only RPM or only boost should be used for GPO control in this mode, simply enter maximum value allowable (by ticking the UP arrow as far as it will go) for the parameter that should be ignored.

In some set-ups it may be desirable to control the time delay (in milliseconds) between the instant the setpoint threshold is physically crossed and the instant the GPO (or the relay) turns ON or OFF. These two time periods are called Activation Delay and Deactivation Delay and implement a feature called hysteresis. You should only use this if necessary in your setup. If not required, just keep these values set to zero (0).
